Photobucket

Monday, February 07, 2011

His New Room-ish

We got rid of Lil C's crib in hopes he would sleep better. While he loves his new set-up, i can't say he sleeps a lot better...but that's another story. Regardless, updating his new room to be toddler-friendly was full of fun projects for us! During the day, we just stack the two mattresses and surround them with pillows, and at night, we can fit them side by side for a comfy sleep, and a chance for mama or daddy to join him if needed.

We saved the crib mattress and brought out an old single mattress of mine to create a nice sleeping nook. So, that called for lots of pillows. I still have one more to make, and need to start that quilt i've had in my head for C, but for the most part his new room is done!
I love the bird pillow - it's from an old framed cross-stitch piece that i needed to save for 'the right project' and here it is! C was named after James Baldwin (middle name) so we had to honour him somehow. J made a shirt for C when he was 9 months old, and since he clearly has outgrown it, i thought of this easy way to keep it longer. And, since his room is Secret Garden themed, i thought of a fun way to use leftover treebark fabric - by making 2 logs!
As C is a book lover already, and we read a lot of books together. And, i really appreciate that C can reach any of his favourite books. I found this great tutorial on-line and it's a perfect solution. I added some pockets on the outside so that C can reach is board books easily. Luckily, i was also able to re-use most of the crib skirt now that we won't need it any longer.
I am also so happy to use our collection of quilts - 2 that used to be J's when he was little. I think his grandma made them both. The painted animals are adorable! And, soon we'll be using sheets/quilts for C to sleep with, instead of the sleep sacks he has now. Then, the awesome quilt our friend Suzanne made for C will be a perfect fit! Soon, i'll get to add the one i've been dreaming up, full of woodland and garden-themed prints (like his big pillow pictured above).

Labels: , , , ,

Wednesday, December 15, 2010

I wanted to fix up our wreath, and saw this great idea on Design Sponge. While i didn't want to devote a whole wreath to my left over felted sweaters (as i had other ideas for them, that i will show you soon), i could at least make a few leaves.
Instead of using an oak template, i looked up holly leaves to trace. I found these pine branches discarded on the side of road, i'm assuming from someone else's tree maybe? Suits me! I also like that i've been able to reuse my standard wreath and just update it a bit. I am calling this year's winter holiday decorations as Chez JVC 'a homemade christmas,' as you can see from my previous post, most of our tree decorations were handmade too.

Labels: , ,

Tuesday, November 30, 2010

Restructured Sweater Hat and Mitts

From this to....

this!

My mom felted an old sweater of my dad's ages ago and i finally found a project worth cutting it up for. As C's winter coat set is a lovely cream and beige, i thought this wool would both look lovely and be so warm and cozy. C is not a fan of most hats and mitts and i've noticed too that his neck sometimes gets exposed with just a hat and jacket. So, i crafted up a loose idea for a patten and whipped up this hat in no time. I searched on-line to find a guide, but couldn't but am quite happy with how it turned out.
I cut out the hat part, and used elves' hats as an inspiration. Then, i added longer pieces cut from the sleeves for the neck part. And, easy enough - i just sewed the neck wrap part onto the hat. Now his neck is never exposed! But, as my wee one is definitely going through some type of growth spurt, i don' think the hat will last all winter.

Labels: , ,

Sunday, November 28, 2010

Our Sunday Morning - Hallway


We finally finished updating our hallway today. We painted it a month ago, and put up new photos and light fixtures. Then, J restructured this old stereo console into a hallway table and shoe shelf (hidden behind the bottom black doors). Didn`t he do such an amazing job, it truly betters our space -not as crowded and hectic! But the finishing touch was this art work we did as a team - Home Sweet Home. We think it ties the spaces well - from foyer entrance to hallway. It also blends together the colours and fabric we used for the new look.

Labels: , , ,

Tuesday, February 09, 2010

Up-Cycling For My Wee One's Bottom

I think i may have mentioned this already, but we are a cloth diaper family here. I've been able to find some great dipes that work for day as well as overnight, but i'm still always looking for better. It's a bit of an addiction really. I also love all the handmade ones i see on-line (namely Etsy of course), as well as some patterns for me to make my own. But, i just don't have the time...Maybe for baby #2 (wow, i'm already there, huh?), i'll be with it enough to make my own.
I also came across some great sites to make your own cloth diaper covers.
As a vegan, i typically don't use wool myself, but as my partner isn't a vegan and nor will C be one (unless he chooses to be), i figured i could reuse some old sweaters my mom had already felted to make some great wool covers. Wool is just that much absorbent, and i love the idea of using what we have. Plus, i have been thinking more about how the vegan diet/culture isn't so organic or earth friendly as i wish it was.

But i digress...
So, after looking on-line at some great tuturiols, i made 3 wool covers for C. I have to admit, while they were pretty easy to make, and adorable, they're not perfect. I need to add elastics to the back to make them fit him better. Otherwise, they're kind of useless, right? But, they fit almost perfectly around his very bulky cloth diapered bum, except for the waist part.

In my research for finding good diaper covers, and things that are EC-friendly, i was so happy that a friend (thanks Rachel) referred to me to this find blog, Childhood Magic. So fun and a great inspiration - from home-schooling, to using wool diaper pants, and more! Check it out.

Labels: , , , ,

Monday, December 28, 2009

Christmas Tags

Just a quick note to check in with you all, as we're still in holiday mode here. Christmas is a week-long vacation for us, not just two days!

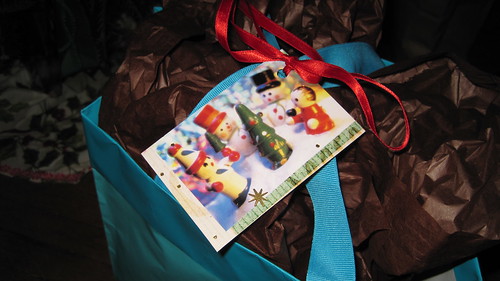
This year, as usual, i wanted to do something fun for gift wrapping and tags. I decided to not buy any new wrapping or bags, nor gift tags. So we used old gift bags (even ones that weren't so festive like this one above) and i looked through my stock of old holiday cards to make gift tags. I don't know why i keep all that i do, but luckily i had a lot of old cards that i could re-use. They make simple tags and are great for my wallet and Mother Earth!

I also used old fabric that i didn't want anymore. I found festively coloured ones from a trip to India i made, and also used fabric remnants from recent projects. Fun and a great way to add to the gift itself!

Labels: , ,

Monday, June 22, 2009

Not Your Everyday Dress

I wanted to spend some time doing things that weren't focused on the baby. So, i set out to make a long overdue project for our clothespins. We have a clothesline that i can't wait to hang our cloth diapers from, but the container that holds the pins gets gunk in it every time it rains. Real gunk that leaves marks on our freshly washed clothes. Defeats the whole purpose, right?
So, i went to my favourite local Value Village in search of the perfect dress to hold them. Yes, i said dress and i went shopping in the baby section not for my baby but for clothespins! I was inspired by other similar projects i've seen in craft and design books, as well as at various blogs - these pin holders were especially popular during the 1930s and 40s, and have such a lovely whimsical feel.

Instead of making one from scratch, i found the perfect dress - one with buttons on the back, so that our hands can reach inside. I just love restructuring things! I then sewed a small pouch to fit inside and hold the pins. I inserted it into the dress, careful to not sew the dress closed or distort its shape. The pouch turned out looking like bloomers - an even cuter addition! I reinforced the stitches to make sure they hold the weight of the pins.

Now i just have to store it inside so that this cute number never gets dirty and weight. Good thing it looks so cute in my kitchen with all my aprons, as the back door to the laundry line is just outside the kitchen!

Labels: , ,

Friday, May 16, 2008

Call Me Ms. Staple Gun

I think i may have found a new part-time job, or at least new hobby - i have been re-upholstering a lot of things lately. I just love the sound of the staple gun against my project, i guess! It is good, though, to be able to look past something old, ugly, and/or ruined and be able to rejuvenate it. A good example of restructuring and re-using for sure!

Here are two recent projects. The first is a vanity chair i wanted to use for my backyard patio. I took of the faux fur seat cover, and replaced it with a fun fabric that i then covered with plastic, so that when i forget to leave it out in the rain, it won't get soaking wet.
The second project is a laundry bin my parents passed on to me. The seat cushion was a bit ruined (stains, tears), so i cleaned it up, removed what needed to be gone, and replaced it with this lovely blue fabric. It looks perfect in our bedroom, and now our cat can enjoy yet another new place to see and look outdoors!

Labels: ,

Sunday, May 04, 2008

When at Home Sick....

I was at home sick most of the week, and after a few days of lying in bed and getting bored, i made a point to try and be creative. Strangely enough, i didn't have the desire to read or watch TV, but really felt productive after making a few things. Here is a bit of a recap for you:
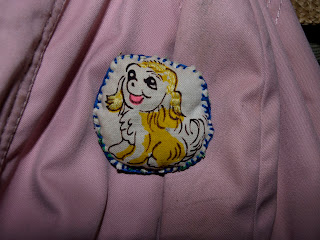
I wanted to play around with some new jewelry ideas and since i love brooches and pins these days, i looked at my fabrics to see if i could make some fabric badges. I found about a dozen lovely fabrics that would do the job. For instance, here is a little pooch who is proudly displayed on my jacket. I embroidered a bit of flair to give the image depth, and just used mattress stitch to finish it off. This was my prototype, and i've already made several others since!

My mom came by recently and gave me even more goodies to play with. This old plastic belt from the 80s turned into some great earrings.I have learned to love to re-upholster. We inherited these amazing chairs but the cushions and fabric have seen better days. So, after going through my favourite barkcloths, i found an amazing choice with birds and flower details. It took a team effort, but i am so happy with the new look!

Labels: ,

Friday, February 22, 2008

My Own Recycled Shopping Bag

Now that my craft room is almost done, and at least usable, i'm able to do things other than of my home projects. One of my first assignments was to make my very own shopping bag that can fit into my purse - like the ones that are getting around everywhere. I just love the idea of squishing a bag into a pouch, and it doesn't weigh a thing - cloth bags are just a bit too heavy and awkward to carry all the time.

I looked at a few models as well as patterns on-line but decided to go with my own design, since i wanted to reuse a broken umbrella. I loved the pattern on the umbrella so much (who can resist polka dots), i kept the umbrella even though it broke a year ago. I knew it would come to good use some day. And, since the material is so similar to the bags for sale, i knew this would be the perfect project. I really liked this pattern, but realized i couldn't really use it on the umbrella material i had. If you would like to make a shopping bag from cloth, it's a great pattern, though!

So, after removing the material from the umbrella itself, it looked like this:
After a bit of sizing, i made a simple pattern of a rectangle with 2 straps (loosely based on the above Burda's template), and then just sewed the pieces together, adding a bottom corner seam. I had just enough for the bag itself, and since the umbrella was made up of a bunch of triangle pieces, i had to be careful how i sewed the bag, in order to not break the original seams. I also didn't have enough for the pouch, so i used lining from an old skirt, and sewed rick rack to it for the closure.

I now have a cute shopping bag that can fit into any of my 'everyday purses,' so i'll never need to use another plastic bag again!

Labels: , ,

Saturday, December 15, 2007

Day 2 - Family Stockings

J requested i make him his very own personalized stocking this year. Since we have been using a basic 'Santa' one i bought him years ago, i guess he was starting to get jealous of the one my mother made me when i was young, as well as the one i made our cat. So, as i know how much he loves my restructuring of things, i made him this stocking of old felted sweaters that have been in the family. Now, all three of us have our very own place on the mantal!
It was pretty easy to make. I outlined a standard stocking for the pattern and cut the arm lengths out of two sweaters. I had scraps remaining of the red sweater - and fortunately one of them being the bottom hem that i used as the boot cuff. i then sewed the stocking right side together on the machine, turned it right-side out, and then finished the detailing with the letter 'J.'

Labels: , , ,

Sunday, November 18, 2007

Remodelled Sweater

I'm slowly starting my holiday gifts for people - much later than usual but i'm trying not to overwhelm myself this year. I have some great ideas that i can't wait to share here, but for the time being, here's a sweater i finished this week. I got this sweet cardigan at a clothing swap 2 years ago but couldn't wear it because of the stains. I knew that there was something i could do with it, but an idea didn't strike me until recently - why not use a Sublime Stitching pattern?!
So, i went through my small stash and found the perfect fit - a unicorn! Since it didn't quite fit all the marks, i also added a shaded stomach and flowers dancing around the unicorn. Now i can finally wear it!

Labels: , ,

Sunday, November 04, 2007

New Fall Jacket

My mom wore this jacket years ago (as she likes to remind me, when she was my age). I have had it with me for years but never really liked how it looked on me. The colour is lovely - a vibrant pink with gold checkers, so i thought it would be a perfect project for me to try and restructure.
With the current trend of short jackets and fewer buttons, i wanted to turn this classic little double-breasted number into something more fun. So, i hemmed the sleeves to 3/4 (which i think is so classy!), shortened the length of the jacket to just above a pant waistline, and got rid of the double-breasted collar and buttons. This also enabled me to make the jacket fit me a bit better and i used a lovely vintage flower button. After dry cleaning it, i got rid of the faded colour, the pressed collar as well as most of the marks from the removed buttons.

This little number is perfect to wear in the fall as it's made from some sort of synthetic tweed that keeps me warm, and i can wear it with my vintage pink elbow gloves!

Labels: , ,

Tuesday, August 07, 2007

Restructured Summer Dress

I have been working hard this summer on making my own summer dresses, and while i have 1 still drawn out but yet to go further, and 2 others sitting unfinished on my dining room/sewing table, i have finished one. Yeah!

Maybe it's because i made up my own simple pattern, but i whipped it up in no time. The best part is that i used J's old button-down shirts so the dress is nice and soft and breatheable cotton for these hot days of summer.

From this:I used 3 different shirts - the green one takes up the skirt portion, and there is a yellow back of a shirt that acts as the back of the bodice. I just thought it would be fun to do like this, but it did create a bit of a challenge to match things up.

To this:
I also used elastics inside to keep the dress up - at the bodice and at the waist. I added this belt from another dress for detail, an Now all i have to do is convince J that it's MY dress, not HIS shirts (he confessed to being a bit weirded out seeing me in his old clothes...).

Labels: , , ,

Monday, January 29, 2007

J's Laptop Cozy

J got a cute Apple iBook a few months ago, and has been lugging it around very carefully. Over the holidays, he asked me to make him a laptop sleeve. I wanted to find something that matched my sewing skills (early intermediate) as well as his needs - something that protected the computer but could fit in his actual school bag. We also didn't want to find something too gender-defining, so i went on the web and searched around.

I found this great tutorial. His commentary was a bit much for me, but i loved that he reused a pant leg and an old sweatshirt: A project perfect for my Restructured Projects. I followed the instructions pretty much to the T, but i did add a pocket to the front of the sleeve.

Whew, that's one thing off my list!

Labels: ,

Thursday, January 18, 2007

My New Phone Cozy

As you can see from my sidebar 'works in progress', i have a non-ending list of 'restructured items' to make. I have so many things that i want to make - leg warmers, new tees, a skirt, you name it! One of my recent finished projects was my new phone cozy that i made from an old sweater. I looked at various phone holders out there and then created my own. I bought a new bright pink Razr phone that i just adore and i needed a holder that was just as cool.

I think this is it.
Unfortunately, i don't have pictures of my method, but here's the idea: I measured the phone and made a lining from light pink felt. I made it with 2 sides, a front and a back panel, as well as a bottom so that i could create a safe little pocket to hold it securely. I then measured out the sweater with just the front and back panels so that the phone was a snug and cozy (hence the creation of that word i guess?) as possible. I also made a flap that i lined and added a snap to close it.

Pretty easy stuff.I also plan to use the sweater to make new leg warmers (from the sleeves) as well as a mini-sweater from the top of it. What a great little sweater - it is offering me so much. I promised J i would make him a laptop sleeve (aka cozy) so that's my next restructured project: i'll be using his old pants and sweatshirt to make it!

Labels: ,